Garden irrigation: One-click watering with predefined time-out
Summary
With Fibaro Home Center 2 I can use the Sprinkler Panel to fully automate my garden watering with no effort. But sometimes I don’t want to fully automate something. For example I just want to push a button and water my garden for 60 minutes. Therefore I created a watering timer by programming a Virtual Device and a LUA scene. With this virtual device I can control exactly when and how long I want to water my garden.
TL;DR
- One-click watering my garden.
- Easy to start with different predefined time-out’s.
- Automatically stop timer at manual control or when the Sprinkler Panel sends a turn off command.
How I implemented it
In words
First you import the Virtual Device I created at my Home Center 2 and note the id of the device. Then you create a new LUA scene and configure the parameters to suit your system.
Before you start implementing I want to state that I control my whole garden irrigation with one Fibaro Wall Plug. If you have more than one Wall Plug to switch multiple irrigation devices you have to change my LUA scene. This is out of scope of this article.
Before you start
Get the id of the Wall Plug connected to your watering system
- Log in to your Fibaro Home Center 2 with admin credentials.
- Click on the Devices tab in top panel and then on your Wall Plug connected to the watering system in the left sidebar.
-
You find the device id at the General tab or in the address bar of your browser. After the substring
id=you’ll find theidof your Wall Plug. The screenshot below shows anidof174:
- Remember the id, or write it on a piece of paper for the next step when you implement the LUA scene.
Get the Id of your Phone for receiving notifications
To get the id of your phone for receiving push notifications is a little bit tricky:
- Open
http://<fibaro_ipaddres>/api/devices?type=iOS_devicein your browser. - A
JSONresponse will show. Select and copy all text to the clipboard. - Open
http://jsonprettyprint.comin your browser. - Paste the text in the jsonprettyprint.com website and click the Pretty Print JSON button.
-
Find your phone name in the list. The id is shown the line above the name. The example below shows an id of
156:"id": 156, "name": "Joep's Phone", "roomID": 0, "type": "iOS_device", "baseType": "", "enabled": true, - Remember the id, or write it on a piece of paper for the next step when you implement the LUA scene.
Step 1: Import the Sprinkler Control Virtual Device
Getting the Virtual Device file
Download the Virtual Device file from my GitHub.
Import the Virtual Device file
- Log in to your Fibaro Home Center 2 with admin credentials.
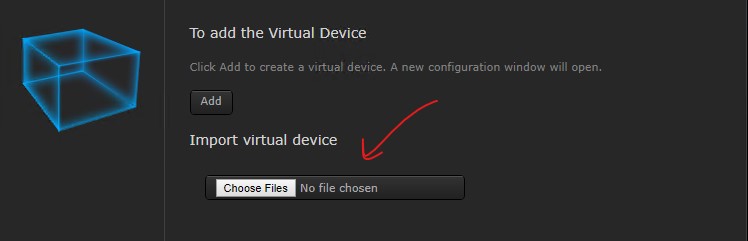
- Click on the Devices tab in top panel and then on Add or remove device button in the left sidebar.
- Click in the Add Device screen on the Choose Files button in the To add the Virtual Device section.
- Select the
SprinklerControl.vfibfile you just downloaded.
Configure the Virtual Device
When the import has finished you can give it a Name and assign it to a Room. I’ll skip the advanced configuration for now, because first you have to create a new LUA scene in the next section to get a scene id to configure the Virtual Device buttons.
Get the ID of the Virtual Device
The easiest way to get the id of the Virtual Device is to look in the address bar of your browser. After the substring id= you’ll find the id of your new Virtual Device. The screenshot below shows an id of 182:

Remember the id, or write it on a piece of paper for the next step when you implement the LUA scene.
Step 2: Create a Sprinkler Control LUA scene
Getting the LUA scene code
- Download the LUA scene code file from my GitHub.
- Open the downloaded
SprinklerControl.luafile with your favorite text editor and copy the contents to the clipboard.
Create a new LUA scene and import the code
- Click on the Scenes tab in* top panel* and then on Add scene button in the left sidebar.
- Click in the New Scene screen on the Add button in the Add scene in LUA section.
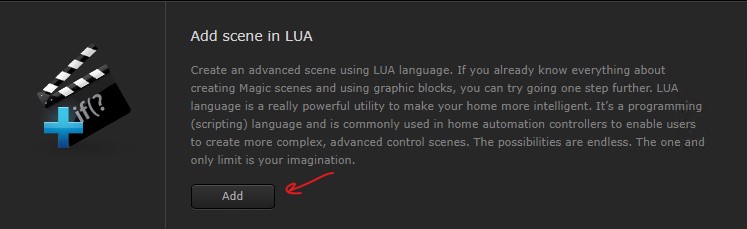
- A new scene is created with the Advanced tab opened as default.
- Remove all code and paste the contents of your clipboard in the online code editor to import the LUA scene code.
Configure the LUA scene
Set the LUA parameters
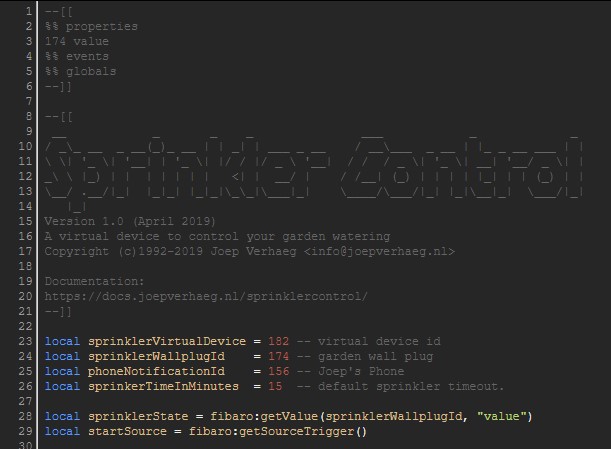
At the top of the code you have to set the id’s of your devices configured in Home Center 2 and the default sprinkler time-out.
-
Change the
174 valueto the id you wrote down in the Get the Id of the Wall Plug.--[[ %% properties 174 value %% events %% globals --]] -
Change the following variables to the id’s you wrote down earlier:
  local sprinklerVirtualDevice = 182 -- virtual device id
  local sprinklerWallplugId    = 174 -- garden wall plug
  local phoneNotificationId    = 156 -- Joep's Phone
  local sprinkerTimeInMinutes  = 15  -- default sprinkler time-out.
The following table explains the variables:
| Variable | Description |
|---|---|
| sprinklerVirtualDevice | Sprinkler Control Virtual Device Id (you just created) |
| sprinklerWallplugId | Fibaro Wall Plug Id that switches watering device on/off |
| phoneNotificationId | Id of phone that receives notifications, set to 0 to disable |
| sprinkerTimeInMinutes | Default sprinkler time-out when no arguments are passed to the LUA scene |
Set the Scene parameters
- Click in the New Scene screen on the General tab.
- Give the Scene a Name and assign it to a Room.
- Set the parameter Max. running instances to
2 - Set the parameter Run scene to
Automatic
Save and get the ID of the LUA scene
-
Click the Save button on the right toolbar to save the LUA scene.
-
After the browser refreshes you’ll find the id of the new LUA scene in the address bar of your browser. The screenshot below shows an id of
41:
-
Remember the id, or write it on a piece of paper for the next step when you change the Virtual Device buttons.
Step 3: Change LUA scene ID in Virtual Device configuration
- Click on the Devices tab in top panel and open your earlier created Virtual Device in the left sidebar.
- Open the Advanced tab and scroll down to the button setup.
All buttons are configured with a line of LUA code to start the Sprinkler Control LUA scene with two parameters:
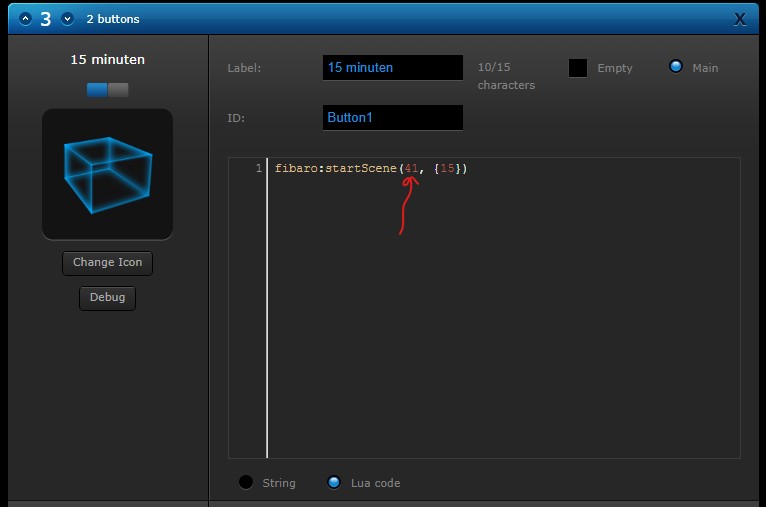
In this example 41 is the scene id and 15 the time-out in minutes. You can change the time-out values of the buttons to your own needs. You have to change the scene id to the id you wrote down earlier in the Save and get the ID of the LUA scene section of this article.
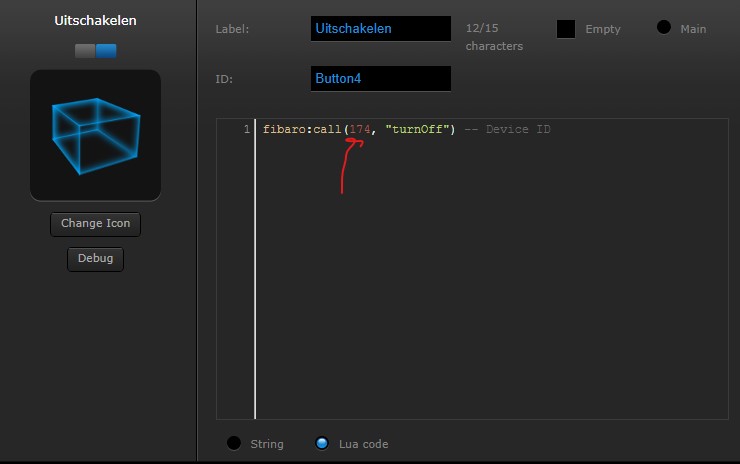
In LUA code in the Turn Off button you have to change de device id to the id you wrote down earlier in the Get the Id of the Wall Plug section of this article. The screenshot below shows an id of 174:
Congratulations!
Take a beer! Everything is finished, you are ready to go!
More information about Virtual Devices
You can read more about creating Virtual Devices in the Creating Virtual Devices Fibaro manual.
Downloads
You can download the files from here:
Explore more like this
Windows 10 Fibaro Home Center 2 and 3 app
While working from home for eight months now I wanted to toggle a light or run a scene from my Windows 10 laptop. After some Googling I didn’t find an...
The Button: Lua code samples to use with Home Center 2
Sometimes I want to manually push a switch to turn on a device or simply run a light scene. Sometimes manual operation is faster than automation. The first Fibaro Button...